I recently obtained an IBM Thinkpad X41 Tablet from ebay. It came with no OS, which was exactly how I wanted it, since I planned to install Linux on it. This post will describe my attempts to install Ubuntu 9.04 on the aforementioned tablet PC.
First, I must thank those on the Internet who have helped me with their work:
Thinkwiki has been a tremendous resource for me- both with my old
X30 and the new
X41 Tablet. In addition to Thinkwiki, several blogs have been helpful in helping me configure the various features of the X41 tablet.
This blog post from the "Words are all Lies" blog was very helpful. Through this post, I was also able to find a link to
LIKEN Apuntes, who has a very nice HOWTO for Ubuntu 8.04.
INSTALL PROCESS:Since the X41 tablet lacks an optical drive, and I do not own the Ultrabay media slice, I decided to install from an external DVD drive (I bought it at
Computer Geeks) instead of converting the image to a USB flash drive. There weren't any issues with booting from an external drive, and the install was quick and painless. The auto-recognition of Wacom tablets in 9.04 rocks, since the X41 tablet uses a Wacom system. I'll write more about that later.
My tablet doesn't have a fingerprint reader, so I didn't worry about setting that up.
I added cellwriter and xournal via synaptic. Cellwriter is a very nice program, but keep in mind that you will have to spend some time calibrating the software, as the program learns to recognize YOUR handwriting instead of a random person's handwriting. This is nice, since my handwriting is atrocious, but relatively consistent.
SCREEN ROTATION/ TABLET INPUT:Easy screen rotation is very important to a tablet PC, and luckily, most of the heavy lifting has already been done here.
LIKEN Apuntes rocks here by providing a tablet rotation script called rotatetablet (it was based on a script by
Saikat Guha).
It is as follows:
#!/bin/bash

#STATUS_FILE=~/.rotate-status
STATUS_FILE=/tmp/.rotate-status

################## Compiz Prevention
function compiz_on {
USER=`ps -ef |grep metacity |grep -v grep|awk -F" " '{print $1}'`
#if [ "$(pidof metacity)" ]
if [ "$USER" ]
then
  echo 'Activating Compiz...'
  #DISPLAY=":0.0" sudo -H -u $USER /usr/bin/compiz --replace &
  #DISPLAY=":0.0" sudo -H -u $USER /usr/bin/emerald --replace &
fi
}

function compiz_off {
USER=`ps -ef | grep compiz.real | grep -v grep | awk -F" " '{print $1}'`
#if [ "$(pidof compiz.real)" ]
if [ "$USER" ]
then
  echo 'Compiz Active. Deactivating...'
  DISPLAY=":0.0" sudo -H -u $USER /usr/bin/metacity --replace &
fi
}
##################################################

######################## Keycodes PgUp/PgDown
function keymap() {
USER=`who |grep tty7 |awk -F" " '{print $1}'`
if [ "$USER" ]
then
  case "$1" in
  1)
     echo 'Modifying xmodmap ...'
     DISPLAY=":0.0" sudo -H -u $USER xmodmap -e 'keycode 105 = Prior'
     DISPLAY=":0.0" sudo -H -u $USER xmodmap -e 'keycode 99 = Next'
     ;;
  *)
     echo 'xmodmap normal ...'
     DISPLAY=":0.0" sudo -H -u $USER xmodmap -e 'keycode 105 = Next'
     DISPLAY=":0.0" sudo -H -u $USER xmodmap -e 'keycode 99 = Prior'
     ;;
  esac
fi
}
###############################
function rotate() {

case "$1" in
    3|right) N=3; T=cw ; compiz_off ; keymap 0 ;;
    1|left) N=1; T=ccw ; compiz_off ; keymap 1 ;;
    2|inverted) N=2; T=half ; compiz_off; keymap 0 ;;
    0|normal) N=0; T=none ; compiz_on ; keymap 0 ;;
    *)
       echo -e "Usage:\n  $(basename $0) [left|right|inverted|normal]";
echo -e "if no option is given, rotates the screen 90 degrees to the right.\n";

       exit 1
       ;;
esac

#xrandr -o $N & \

#More secure
if [ "`/usr/bin/xrandr -o $N -v | grep -i 'randr' | wc -l`" -ne "1" ]
then
    echo '!! Something went wrong...'
    export DISPLAY=":0.0"
    export XAUTHORITY=/var/lib/gdm/\:0.Xauth
    #/usr/bin/xset -display $DISPLAY dpms
    echo 'Trying to unrotate again...'
    /usr/bin/xrandr -o $N &
fi

xsetwacom set stylus Rotate $T & \
echo $N > $STATUS_FILE
}

if [ "$#" == "0" ]; then
rotate $(((3+0$(cat $STATUS_FILE 2>/dev/null))%4))
else
rotate $1
fi
Note that this script can be used without any arguments to rotate the screen 90 degrees to the right, but can also be used with the arguments [left|right|inverted|normal] to skip to a particular screen orientation.
I saved this script to /usr/bin/rotatetablet and made the file executable:
$ chmod +x /usr/bin/rotatetablet
I then added two custom launchers to my top gnome panel. One launcher rotates to the right, the other returns the orientation to normal.
Here's how I added them:
- Right click on the top gnome panel and choose "Add to Panel..."
- Choose "Custom Application Launcher- Create a new launcher" and click "Add"
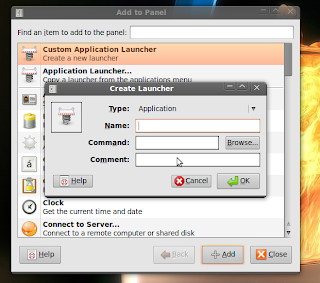
- "Type" Application
- "Name" Rotate to tablet mode
- "Command" /usr/bin/rotatetablet
- "Comment" Tablet rotates 90 degrees to the right
- Close that icon and make a second launcher to get you back to normal. The second launcher is very similar- make sure to pick a different icon for this one.
- "Type" Application
- "Name" Rotate back to normal
- "Command" /usr/bin/rotatetablet normal
- "Comment" Tablet rotates back to normal orientation
OK. Now screen rotation is taken care of, but the tablet input won't rotate with your screen rotation, at least not yet. This can be fixed, though. Keep in mind that this fix is borrowed from
words are lies (who, in turn, borrowed it from
the ubuntu forums).
Type in the terminal:
sudo gedit /etc/init.d/wacomtohal
and paste in these lines:
#! /bin/sh
## find any wacom devices
for udi in `hal-find-by-property --key input.x11_driver --string wacom`
do
type=`hal-get-property --udi $udi --key input.x11_options.Type`
## rewrite the names that the Xserver will use
hal-set-property --udi $udi --key info.product --string $type
done
Save it, close it, and run these two commands in terminal:
sudo chmod +x /etc/init.d/wacomtohal
sudo update-rc.d wacomtohal defaults 27
After you've done that, restart. Everything should work just fine once you've restarted.
I couldn't find any simple "rotate" icons, so I created a small series of SVG (scalable vector graphics) icons that do an adequate job for me. They are located at
gnome-look.org. A link to the icons is
here.
TABLET HARDWARE BUTTONS:Concerning the Tablet hardware buttons, I'd like to give
Thinkwiki the credit for mapping all of these buttons already. Nonetheless, I've had a small amount of trouble getting them going.
The first set of hardware keys I don't have issues with at all. I wanted to map PageUp, PageDown, Esc, and Enter to the actual PageUp, PageDown, Esc, and Enter keys. This was easy.
Using gedit or your favorite text editor, open /etc/rc.local
(
$ sudo gedit /etc/rc.local) and add these lines:
# PageDown, PageUp, Enter, Escape
setkeycodes 6e 109
setkeycodes 6d 104
setkeycodes 69 28
setkeycodes 6b 1
OK, so far, so good. However, my attempts to map the remaining two buttons (a button that has an icon that looks like a toolbox, and a rotation button) have been less successful.
Words are lies suggests binding the remaining hardware buttons to (nonexistent) keys 130, 131, and 132. Keymaps usually end at 120 or so, but have room for more codes-it goes from 0 to 255.
This didn't work well for me, so I decided to modify my approach. First of all, I don't have a button that says Ctrl-Alt-Del. I think they are referring to the power button as the Ctrl-Alt-Del key. I took a picture of the hardware buttons in question, as I haven't really seen a close-up picture on the net yet. Here it is:

My goal for the two unassigned buttons would be to have the toolbox button link to cellwriter and the rotate button link to /usr/bin/rotatetablet. Since I wasn't having much luck assigning the keys to arbitrary keycodes, I decided to map them to keys that I don't use- Scroll Lock and Pause. I found the keycodes for these keys by typing "
sudo dumpkeys | less" and looking for the keycodes for Scroll Lock and Pause. On my laptop, those keys are 70 and 119, respectively. I bind these hardware buttons by updating my /etc/rc.local file to reflect this information:
# PageDown, PageUp, Enter, Escape
setkeycodes 6e 109
setkeycodes 6d 104
setkeycodes 69 28
setkeycodes 6b 1
# Tablet Menu Key-bound to Pause
setkeycodes 68 119
# Tablet Rotate-bound to Scroll Lock
setkeycodes 6c 70
# Tablet Ctrl-Alt-Del Key
setkeycodes 67 132
I then created keyboard shortcuts for the two commands in gnome. In Ubuntu, Click System --> Preferences --> Keyboard Shortcuts, then click add to add a Custom Shortcut, as the following picture shows. Simply need name the shortcut and provide a path to the command.
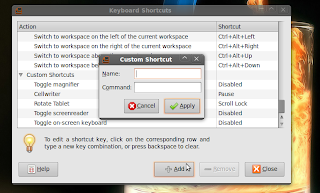
After that, click the Shortcut field, and assign the button that you wish to use. I have often used this Shortcut field to test that my hardware buttons were mapped to the correct keyboard button, as well.
I've gotten this to work, but I haven't gotten it to work reliably, so I tend to use the icon shortcuts instead.
The volume buttons worked automatically, but they are linked to the hardware volume, and do not show on the On Screen Display. If you notice that you don't have any sound, try pushing the Volume Up button, and you should be able to hear sounds again. I haven't thought of any uses for the "Access IBM" button, so I have left it alone.
CONCLUSION:Overall, I'm very happy with the Thinkpad X41 tablet. I've enjoyed the tablet functionality, as I've never owned a tablet before purchasing this one. Some of the tablet buttons have been frustrating, but they haven't been a deal-breaker for me.
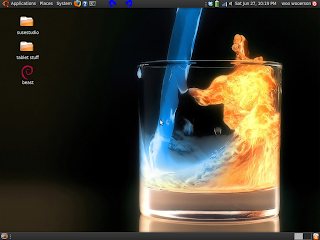
Here are screenshots of the X41 in tablet and landscape modes:

 Xournal is a great Linux note-taking tool. I chose it because I don’t need the multi-platform or networked aspects of Jarnal, and appears to have more useful features than Gournal or NoteLab though NoteLab looks like it could hold its own weight, depending on the intended use.


