Showing posts with label Port Forwarding. Show all posts

Wednesday, July 1, 2009

Port Forwarding using Tomato and DynDNS

Port Forwarding on the router level is useful if you have more than one computer, but you know that you plan to make specific services available to the outside world on only one of the computers that you own. Also, you can make different services point to different computers. For example, you can forward ssh traffic to computer A, use computer B as your web server, or (if you read my previous post) access the web server running inside of VirtualBox on Computer C.

This particular post will refer to forwarding single ports to particular machines on your internal network, using the Tomato router firmware, as well as using a service called DynDNS to more easily access your dynamic IP address over the Internet.

This setup was accomplished with a Buffalo WHR-HP-G54 router, flashed with the Tomato Firmware.

PORT FORWARDING IN TOMATO:

Tomato is user friendly, providing sample port forwarding to help users with the formatting and syntax of the process.
Here is a screen shot that shows the port forwarding screen:

To forward a single port to the same port on a particular IP:
External Ports: 9090
Internal Ports: (blank)
Internal Address: 192.168.1.11 (your computer's IP address)

To forward a port to a different internal port:
External Ports: 1010 (as seen from the Internet)
Internal Ports: 1212 (as seen inside your LAN)
Internal Address: 192.168.1.11 (your computer's IP address)

You can choose to forward TCP packets, UDP packets, or both.

If you read my previous post about port forwarding in VirtualBox, port forwarding in your router would allow you to make open virtual machine ports to the Internet at large.

As an example, you could open port 80 on your virtual machine, forward traffic from port 80 to port 8080 of host Computer A, then have incoming router traffic on port 80 forward to port 8080 on Computer A, so that when external traffic comes in on port 80, it is routed to the server virtual machine running on Computer A.

USING DynDNS:

What is DynDNS? Allow me to borrow this description from their website:

Dynamic DNS Free (DDNS) allows you to create a hostname that points to your home or office IP address, providing an easy-to-remember URL for quick access. We also provide an update mechanism which makes the hostname work with your dynamic IP address. We continue to offer this service free to the Internet community as we have done so for nearly 10 years.

Now, instead of having to remember your external IP address of 12.34.56.78 (or a dynamically changing one), you can use a service such as DynDNS to be able to use samplename.thruhere.net instead of 12.34.56.78 in an Internet browser such as Firefox to access your computer. It tends to be easier to remember, and easier to tell your friends or colleagues.

For the free DNS forwarding, DynDNS offers these domains to choose from:
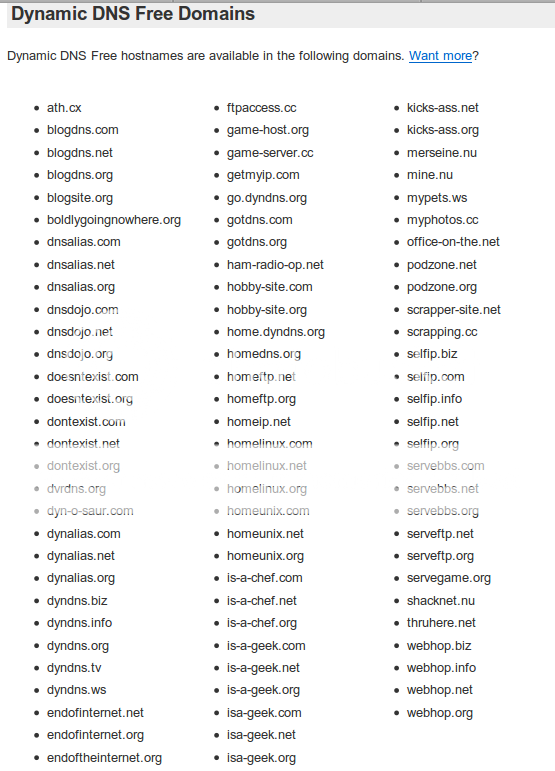

Sign up for a free DynDNS account, choose a domain and link it to your dynamic IP. From now on, you can use this personal URL to access your computer from the Internet. If you want, you can continue to use your IP, but I'd be surprised if you do. This URL actually points to your router, so port forwarding from your router allows you to point traffic from the Internet to particular computers on your network.

VERIFYING ROUTER SECURITY:

First, a security precaution: Many routers are administered through port 80 (the standard web traffic port), even if traffic comes externally. Tomato allows you to disable external access (or change the administration port), so it isn't as big of an issue, but make sure to look in your router settings to verify that you are not opening yourself up to convenient remote router cracking (especially if you still use the default passwords- shame, shame!).

One way to verify if your router is allowing remote administrative access is this:
  • Go to IP Chicken to get your current IP.
  • Copy that address and paste it into your web browser address window and press Enter.
  • If your router password verification window comes up, you can access your router remotely.
  • Try this again with your shiny new DynDNS URL. Note that the result should be the same as if your typed in the IP directly.
USING PORT FORWARDING ALONG WITH DynDNS:

OK. You have your shiny new DynDNS account, and you've secured your router from external attacks. Now, enjoy the convenience of your work! For example, FreeNAS offers a Transmission Bittorrent WebGUI which defaults to port 9091. You can forward external traffic from this port directly to your FreeNAS box. Now, samplename.thruhere.net:9091 would bring up your Transmission WebGUI, anywhere in the world that has internet access! Alternatively, you could forward port 80 to port 9091 of your FreeNAS box, thus allowing samplename.thruhere.net to access your WebGUI directly. I suggest using user authentication, but that's up to you.

Now, while reading Distrowatch, if your Linux distribution of choice releases a new version, this would allow you to add a torrent while drinking a coffee at a coffee house, then come home to a torrent that is already downloaded. That beats the alternative of waiting to start the download until you get home. Enjoy!

VirtualBox NAT Port Forwarding with VBoxManage

VirtualBox is a free, powerful and versatile virtualization program which is available for Linux, Mac, and Windows hosts, and can virtualize many different Operating Systems. VirtualBox was originally developed by innotek, but was purchased by Sun and renamed Sun xVM VirtualBox. There are several versions of the program, but I use the free closed-source version, since it has more features than Virtualbox OSE.

Several networking modes are available for the Virtualbox guest OS to connect to the Internet, but I will specifically mention Network Address Translation (NAT) networking here.

The Virtualbox manual describes the advantages and disadvantages of NAT in this way:
Network Address Translation (NAT) is the simplest way of accessing an external network from a virtual machine. Usually, it does not require any configuration on the host network and guest system. For this reason, it is the default networking mode in VirtualBox.

A virtual machine with NAT enabled acts much like a real computer that connects to the Internet through a router. The “router”, in this case, is the VirtualBox networking engine, which maps traffic from and to the virtual machine transparently. The disadvantage of NAT mode is that, much like a private network behind a router, the virtual machine is invisible and unreachable from the outside internet; you cannot run a server this way unless you set up port forwarding (described below).
So, your shiny new virtual machine can access the net, but is invisible to other devices on your network. Usually this isn't an issue, but it isn't possible to ssh into your virtual machine or access any services of the machine (such as a webserver) without configuration of port forwarding.

PORT FORWARDING IN VIRTUALBOX:

Port Forwarding can be initiated through the powerful and versatile VBoxManage command-line utility. VBoxManage has many options, but we will be using the “setextradata” feature to configure port forwarding.

The following commands will allow you to access your virtual machine via ssh. For this to work, I am making several assumptions about the guest OS:

* Your virtual machine is not currently running, but has already been created and saved.
* Your guest OS has ssh installed and correctly configured
* Your guest OS is set up with the VirtualBox's default virtual network hardware (PCNET III)
* sshd is listening for incoming connections at the default port (port 22)
* Your guest OS is named “VM Name Here”, although I'd wager that isn't the actual name of your VM.

If you don't know the name of your virtual machine, the easiest way to verify the name is to start Virtualbox and to look at the names of the machines listed on the main screen. Scrolling down on the details also allows you to see other information, such as the network adapter being used.


The following commands will forward TCP traffic that originates from port 2222 on your host OS to port 22 on your guest OS:

$ VBoxManage setextradata "VM Name Here" "VBoxInternal/Devices/pcnet/0/LUN#0/Config/guestssh/Protocol" TCP

$ VBoxManage setextradata "VM Name Here" "VBoxInternal/Devices/pcnet/0/LUN#0/Config/guestssh/GuestPort" 22

$ VBoxManage setextradata "VM Name Here” "VBoxInternal/Devices/pcnet/0/LUN#0/Config/guestssh/HostPort" 2222


Note the usage of double quotes for the virtual machine name. If you decided on a virtual machine name that is only one word such as “VMNameHere”, you can technically omit these double quotes, like this:

$ VBoxManage setextradata VMNameHere "VBoxInternal/Devices/pcnet/0/LUN#0/Config/guestssh/Protocol" TCP

$ VBoxManage setextradata VMNameHere "VBoxInternal/Devices/pcnet/0/LUN#0/Config/guestssh/GuestPort" 22

$ VBoxManage setextradata VMNameHere "VBoxInternal/Devices/pcnet/0/LUN#0/Config/guestssh/HostPort" 2222


There is no harm done in leaving them there, so do whatever makes you feel most comfortable.

FYI, there are some limitations to NAT port forwarding, and I will list them as they are listed in the VirtualBox Manual:

There are four limitations of NAT mode which users should be aware of:
  • ICMP protocol limitations: Some frequently used network debugging tools (e.g. ping or tracerouting) rely on the ICMP protocol for sending/receiving messages. While ICMP support has been improved with VirtualBox 2.1 (ping should now work), some other tools may not work reliably.
  • Receiving of UDP broadcasts is not reliable: The guest does not reliably receive broadcasts, since, in order to save resources, it only listens for a certain amount of time after the guest has sent UDP data on a particular port. As a consequence, NetBios name resolution based on broadcasts does not always work (but WINS always works). As a workaround, you can use the numeric IP of the desired server in the \\server\share notation.
  • Protocols such as GRE are unsupported: Protocols other than TCP and UDP are not supported. This means some VPN products (e.g. PPTP from Microsoft) cannot be used. There are other VPN products which use simply TCP and UDP.
  • Forwarding host ports lower than 1024 impossible: On Unix-based hosts (e.g. Linux, Solaris, Mac OS X) it is not possible to bind to ports below 1024 from applications that are not run by root. As a result, if you try to configure such a port forwarding, the VM will refuse to start.
These limitations normally don’t affect standard network use. But the presence of
NAT has also subtle effects that may interfere with protocols that are normally working. One example is NFS, where the server is often configured to refuse connections from non-privileged ports (i.e. ports not below 1024).


VBoxManage is an incredibly powerful utility, and this post just scratches the surface of its abilities. There is an entire section of the user manual dedicated to VBoxManage, and I encourage you to read it and discover the other things it can do.

I will cover Port Forwarding from the router to the host computer in a later post.