- VMM: fixed network regressions (guest hangs during network IO) (bug Fixed in SVN (reopened)">#4343)
- VMM: guest SMP performance improvements
- VMM: fixed hangs and poor performance with Kaspersky Internet Security (VT-x/AMD-V only; bug fixed in SVN (reopened)">#1778)
- VMM: fixed crashes when executing certain Linux guests (software virtualization only; bugs fixed in SVN/3.0.2 (closed)">#2696 & VBox crash -> fixed in SVN/3.0.2 (closed)">#3868)
- ACPI: fixed Windows 2000 kernel hangs with IO-APIC enabled (bug fixed in ... (closed)">#4348)
- APIC: fixed high idle load for certain Linux guests (3.0 regression)
- BIOS: properly handle Ctrl-Alt-Del in real mode
- iSCSI: fixed configuration parsing (bug #4236)
- OVF: fix potential confusion when exporting networks
- OVF: compatibility fix (bug #4452)
- NAT: fixed crashes under certain circumstances (bug fixed in SVN (closed)">#4330)
- 3D support: fixed dynamic linking on Solaris/OpenSolaris guests (bug Fixed in SVN. (closed)">#4399)
- 3D support: fixed incorrect context/window tracking for multithreaded apps
- Shared Folders: fixed loading from saved state (bug #1595)
- Shared Folders: host file permissions set to 0400 with Windows guest (bug ... (closed)">#4381)
- X11 host and guest clipboard: fixed a number of issues, including bug fixed in SVN (closed)">#4380 ... (closed)">#4344 and
- X11 Additions: fixed some issues with seamless windows in X11 guests (bug fixed in SVN (closed)">#3727)
- Windows Additions: added VBoxServiceNT for NT4 guests (for time synchronization and guest properties)
- Windows Additions: fixed version lookup
- Linux hosts: workaround for buggy graphics drivers showing a black VM window on recent distributions (bug #4335)
- Linux hosts: fixed typo in kernel module startup script (bug Fixed in SVN (closed)">#4388)
- Installer: support Pardus Linux
- Solaris hosts: several installer fixes
- Solaris host: fixed a preemption issue causing VMs to never start on Solaris 10 (bug #4328).
- Solaris guest: fixed mouse integration for OpenSolaris 2009.06 (bug fixed in SVN (closed)">#4365)
- Windows hosts: fixed high CPU usage after resuming the host (bug fixed in SVN/3.0.2 (closed)">#2978)
- OVF: accept ovf:/disk/ specifiers with a single slash in addition to ovf://disk/#4452) (bug
- Fixed a settings file conversion bug which sometimes caused hardware acceleration to be enabled for virtual machines that had no explicit configuration in the XML.
Wednesday, July 15, 2009
VirtualBox 3.0.2 released!
FYI, VirtualBox recently released a maintenance release to the popular VirtualBox virtulization program. Get downloading! Here is the changelog:
Saturday, July 4, 2009
Installing Cacti on CentOS 5.2

Cacti is a GPL-licensed, scalable, RRDtool-based monitoring program with flexible graphing options. This article describes the process of installing and configuring Cacti on CentOS 5.2.
Useful links to this installation were BXtra and TechDB.
Per the Cacti documentation, Cacti requires:
RRDTool 1.0.49 or 1.2.x or greaterI'd also recommend installing vim, net-snmp, net-snmp-utils, php-snmp, initscripts, perl-rrdtool, and any dependencies.
MySQL 4.1.x or 5.x or greater
PHP 4.3.6 or greater, 5.x greater highly recommended for advanced features
A Web Server e.g. Apache or IIS
To perform this install, I am logged into Gnome as a normal user, and opened a terminal that is switched to the root user using the su command. I had already installed apache, mysql, and PHP during the original install process of CentOS 5.2.
I added a new repository to facilitate this install. To do this, I created a file
(/etc/yum.repos.d/dag.repo) containing Dag Wiers repository, which contains rrdtool, among other things.
[dag] name=Dag RPM Repository for Red Hat Enterprise Linux baseurl=http://apt.sw.be/redhat/el5/en/i386/dag gpgcheck=1 gpgkey=http://dag.wieers.com/rpm/packages/RPM-GPG-KEY.dag.txt enabled=1
You can create this file by typing vim /etc/yum.repos.d/dag.repo and copying and pasting the above information into the file. Be warned that the above text containing the repository is version and architecture-specific.
I then typed yum update to update CentOS and the repository list before installing additional software.
I installed everything but cacti through yum. You can verify that you have the packages in question (or the version numbers of installed packages) by attempting to install them, as yum will remind you that you already have the latest version installed, as well as the version status of the packages, like shown here:
# yum install php httpd mysql mysql-server php-mysql vim-enhanced net-snmp net-snmp-utils php-snmp initscripts perl-rrdtool rrdtool initscripts
Loaded plugins: fastestmirror, priorities
Loading mirror speeds from cached hostfile
* base: pubmirrors.reflected.net
* updates: mirror.fdcservers.net
* addons: chi-10g-1-mirror.fastsoft.net
* extras: mirror.fdcservers.net
Setting up Install Process
Parsing package install arguments
Package php-5.1.6-23.2.el5_3.i386 already installed and latest version
Package httpd-2.2.3-22.el5.centos.1.i386 already installed and latest version
Package mysql-5.0.45-7.el5.i386 already installed and latest version
Package mysql-server-5.0.45-7.el5.i386 already installed and latest version
Package php-mysql-5.1.6-23.2.el5_3.i386 already installed and latest version
Package 2:vim-enhanced-7.0.109-4.el5_2.4z.i386 already installed and latest version
Package 1:net-snmp-5.3.2.2-5.el5_3.1.i386 already installed and latest version
Package 1:net-snmp-utils-5.3.2.2-5.el5_3.1.i386 already installed and latest version
Package php-snmp-5.1.6-23.2.el5_3.i386 already installed and latest version
Package initscripts-8.45.25-1.el5.centos.i386 already installed and latest version
Package perl-rrdtool-1.3.7-1.el5.rf.i386 already installed and latest version
Package rrdtool-1.3.7-1.el5.rf.i386 already installed and latest version
Package initscripts-8.45.25-1.el5.centos.i386 already installed and latest version
Nothing to do
Download the latest version of Cacti (0.8.7e, as of the writing of this article) from here. I downloaded it to my desktop and unzipped it by right clicking it and selecting "Extract here". I also renamed the cacti-0.8.7e directory by right clicking and selecting "Rename". You could do this in the command line, if you wanted to:
[your root shell] # tar xzvf cacti-0.8.7e.tar.gzMove the entire cacti directory to /var/www/html/ :
[your root shell] # mv cacti-0.8.7e cacti
[your root shell] # mv cacti /var/www/htmlI chose to create a 'cactiuser' user (and cacti group) to run cacti commands and to have ownership of the relavent cacti files. It was here that I noticed that my install did not have any of the /sbin directories in its $PATH , so I simply typed the absolute path:
[your root shell] # /usr/sbin/groupadd cactiChange the ownership of the /var/www/html/cacti/rra/ and /var/www/html/cacti/log/ directories to the cactiuser we just created:
[your root shell] # /usr/sbin/useradd -g cacti cactiuser [your root shell] # passwd cactiuser
[your root shell] # cd /var/www/html/cacti
[your root shell] # chown -R cactiuser rra/ log/
Create a mysql root password, if you haven't already (password in this example is samplepass:
[your root shell] # /usr/bin/mysqladmin -u root password samplepass
Create a MySQL database for cacti:
[your root shell] # mysqladmin --user=root --password=samplepass create cacti
Change directories to the cacti directory, and use the cacti.sql file to create tables for your database:
[your root shell] # cd /var/www/html/cacti
[your root shell- cacti] # mysql --user=root --password=samplepass cacti < cacti.sql
I also created a MySQL username and password for Cacti:
[your root shell] # mysql --user=root --password=samplepass
Welcome to the MySQL monitor. Commands end with ; or \g.
Your MySQL connection id is 28
Server version: 5.0.45 Source distribution
Type 'help;' or '\h' for help. Type '\c' to clear the buffer.
mysql> GRANT ALL ON cacti.* TO cactiuser@localhost IDENTIFIED BY 'samplepass';
Query OK, 0 rows affected (0.00 sec)
mysql> flush privileges;
Query OK, 0 rows affected (0.00 sec)
mysql> exit
Bye
Edit /var/www/html/cacti/include/config.php with your favorite editor, and update the information to reflect our cacti configuration (you can leave the other text in the file alone):
/* make sure these values refect your actual database/host/user/password */Create a cron job that polls for information for Cacti (I'm choosing to use /etc/crontab here):
$database_type = "mysql";
$database_default = "cacti";
$database_hostname = "localhost";
$database_username = "cactiuser";
$database_password = "samplepass";
$database_port = "3306";
[your root shell] # vim /etc/crontab
Add this line to your crontab:
*/5 * * * * cactiuser /usr/bin/php /var/www/html/cacti/poller.php > /dev/null 2>&1Edit your PHP config file at /etc/php.ini to allow more memory usage for Cacti. It is a relatively large text file- using vim, I search for "memory_limit" by typing /memory_limit in command mode.[your root shell] # vim /etc/php.iniBefore I check to see if Cacti works, I want to check and see if mysqld and httpd are running using the service command.
I changed memory_limit = 8M to memory_limit = 128M
[your root shell] # /sbin/service mysqld status
[your root shell] # /sbin/service httpd status
If mysqld and httpd are running, great. If not, type:
[your root shell] # /sbin/service mysqld startIf you're an "I need to see what the output looks like" type, here is an example of the previous command:
[your root shell] # /sbin/service httpd start
[your root shell] # /sbin/service mysqld statusYou should now be able to access cacti at http://localhost/cacti from the local computer or from any computer within your LAN network at http://your.internal.IP.address/cacti .
mysqld is stopped
[your root shell] # /sbin/service mysqld start
Initializing MySQL database: Installing MySQL system tables...
OK
Filling help tables...
OK
To start mysqld at boot time you have to copy
support-files/mysql.server to the right place for your system
PLEASE REMEMBER TO SET A PASSWORD FOR THE MySQL root USER !
To do so, start the server, then issue the following commands:
/usr/bin/mysqladmin -u root password 'new-password'
/usr/bin/mysqladmin -u root -h localhost.localdomain password 'new-password'
See the manual for more instructions.
You can start the MySQL daemon with:
cd /usr ; /usr/bin/mysqld_safe &
You can test the MySQL daemon with mysql-test-run.pl
cd mysql-test ; perl mysql-test-run.pl
Please report any problems with the /usr/bin/mysqlbug script!
The latest information about MySQL is available on the web at
http://www.mysql.com
Support MySQL by buying support/licenses at http://shop.mysql.com
[ OK ]
Starting MySQL: [ OK ]
There should be a Cacti Installation Guide window that shows up, giving licensing info and the like. Click "Next".
Select "New Installation", since this is a new installation.
The next window to pop up should tell you whether Cacti could find the paths to all of the elements that Cacti needs to run, such as RRDtool, PHP, snmp stuff, etc. If everything but Cacti was installed via yum, you should be good here. Click "Finish" to save the settings and bring up the login window.
Below is a screenshot of the login window. The default user name is admin. The default password is admin. It should prompt an automatic password change for the admin account when you log in the first time.

If you successfully log in, I'd recommend taking a break here. Depending on how fast you are, your cron job may not have had enough time to run the poller program and create data for your graphs. I'd suggest taking a deep breath, or brewing a cup of tea (or coffee) for yourself.
The localhost machine should have some graph templates that are already created, but you can click the "Create Additional Devices" link to add graphs for any other machines on your network. I added my FreeNAS box (tutorial for that to follow).
After having consumed your beverage of choice, press the "Graphs" button. Cacti should have a graph showing you a couple minutes of data for the machines you have added. The longer your machine is on, the more informational the graphs will be. Also, if you click on a particular graph, Cacti will Congratulations! You're now monitoring!
View the Cacti documentation page for more information on how to take advantages of Cacti.
Below are some graphs that were made using Cacti.


Friday, July 3, 2009
CentOS 5.2 netinstall on an IBM Thinkpad X41 Tablet
INTRODUCTION:
This is a post about my experience installing CentOS 5.2 via a network install on my IBM Thinkpad X41 Tablet. Previously, this laptop had Ubuntu 9.04 installed on it, and I will compare and contrast the two installs if I feel it's worth mentioning.
CENTOS NETINSTALL PROCESS:
I downloaded and burned the CentOS 5.2 netinstall CD very quickly. It's only a 7.7 MB download, which allowed me to get started right away.
After booting the CD, I chose to install via HTTP. CentOS asks for two things: Web site name and CentOS directory. I provided:
I chose to customize, picked out my packages, and started the install.
Net install took about an hour or so. Not as fast as the 15 minute Ubuntu 9.04 install, but not bad considering that I was downloading everything directly from the Internet.
UPDATES:
After the successful install, I rebooted and verified a couple more options on the first boot dialog, then was greeted with the friendly reminder that I need to update 219 of my packages. Fun. That took another hour or two. It looks like it upgraded my system to CentOS 5.3 after my first boot.
SELinux argued with my updates a little. It had about 20 warnings or so, indicating that it had could have denied access to programs as they attempted to execute commands and write to files, but decided not to since it was in permissive mode. I eventually decided to disable SELinux.
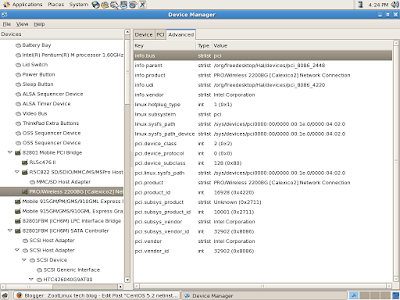
NETWORKING:
Although Ubuntu auto-recognized my Centrino 802.11G (Intel PRO Wireless 2200BG) wireless chipset, CentOS immediately searched for eth0 (wired network adapter) and ignored my wireless capabilities. I had a spare cable in front of me to plug into the laptop, but this was not a step I had to do in my Ubuntu 9.04 install. Even after the install, it didn't configure the wireless. I find this suprising, given the relatively common nature of the chipset, as well as the fact that my wireless adapter is listed when I go to System --> Administration --> Hardware
CELLWRITER:
The Cellwriter handwriting recognition program wasn't in the repositories that I had, so I found an RPM of cellwriter here and installed it.
XOURNAL:
When I installed Xournal, it did not create a Gnome menu entry for itself. I added a link to the application in the Gnome panel. The Xournal icon was installed at /usr/share/xournal/pixmaps/xournal.svg, so I used that as the icon in the panel.
DROPBOX:
Binaries for Linux versions Dropbox are only available for Ubuntu and Fedora at this point, and Dropbox threw up an error during the ./configure portion of compiling from source for me:
checking for NAUTILUS... configure: error: Package requirements (libnautilus-extension >= 2.16.0) were not met:
No package 'libnautilus-extension' found
Consider adjusting the PKG_CONFIG_PATH environment variable if you
installed software in a non-standard prefix.
Alternatively, you may set the environment variables NAUTILUS_CFLAGS
and NAUTILUS_LIBS to avoid the need to call pkg-config.
See the pkg-config man page for more details.
I considered simply installing the dropboxd daemon, using the instructions for a text based install of Dropbox that were provided on the Dropbox site, and I would have if I were to run CentOS as a full time desktop OS, but I felt that was beyond the scope of this review.
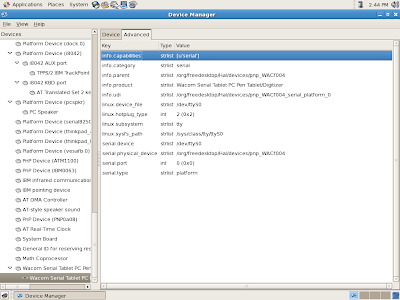
WACOM TABLET FUNCTIONALITY:
I was hopeful about this functionality, given that the Wacom Tablet PC adapter is listed under System --> Administration --> Hardware, as the screenshot below shows.
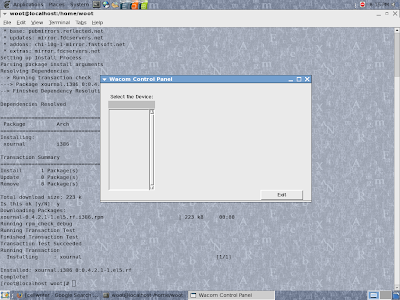
I also found a Wacom Control Panel tool under Applications --> System Tools --> Wacom Control Panel. However, the tool was not very helpful, as the screenshot shows. The Control Panel tool did not allow me to select or change any options, despite knowing the information contained in the Device Manager.
I attempted to add info manually to /etc/X11/xorg.conf as suggested by Thinkwiki:
I restarted the whole laptop........no luck.
This was the point that I abandoned trying to get the tablet portion working.
I understand that The Linux Wacom Project may be able to help me further, but I do not intend to run CentOS on this laptop much longer, given that some other distros appear to be more tablet friendly.
CONCLUSION:
My experience with CentOS leads me to believe that tablet PCs are not a big priority in the development of this distribution, especially compared to my Ubuntu 9.04 install. That's not awful, though, since CentOS is designed for stability first, instead of shiny new features. During the testing process, I was able to install and configure Cacti on this laptop, which was enjoyable, but I will detail that process in a different post. I plan on installing something else on this laptop soon, as CentOS doesn't take advantage of everything the X41 tablet has to offer.
This is a post about my experience installing CentOS 5.2 via a network install on my IBM Thinkpad X41 Tablet. Previously, this laptop had Ubuntu 9.04 installed on it, and I will compare and contrast the two installs if I feel it's worth mentioning.
CENTOS NETINSTALL PROCESS:
I downloaded and burned the CentOS 5.2 netinstall CD very quickly. It's only a 7.7 MB download, which allowed me to get started right away.
After booting the CD, I chose to install via HTTP. CentOS asks for two things: Web site name and CentOS directory. I provided:
# Web site name
mirror.centos.org
# CentOS directory
/centos/5.2/os/i386
I chose to customize, picked out my packages, and started the install.
Net install took about an hour or so. Not as fast as the 15 minute Ubuntu 9.04 install, but not bad considering that I was downloading everything directly from the Internet.
UPDATES:
After the successful install, I rebooted and verified a couple more options on the first boot dialog, then was greeted with the friendly reminder that I need to update 219 of my packages. Fun. That took another hour or two. It looks like it upgraded my system to CentOS 5.3 after my first boot.
SELinux argued with my updates a little. It had about 20 warnings or so, indicating that it had could have denied access to programs as they attempted to execute commands and write to files, but decided not to since it was in permissive mode. I eventually decided to disable SELinux.
NETWORKING:
Although Ubuntu auto-recognized my Centrino 802.11G (Intel PRO Wireless 2200BG) wireless chipset, CentOS immediately searched for eth0 (wired network adapter) and ignored my wireless capabilities. I had a spare cable in front of me to plug into the laptop, but this was not a step I had to do in my Ubuntu 9.04 install. Even after the install, it didn't configure the wireless. I find this suprising, given the relatively common nature of the chipset, as well as the fact that my wireless adapter is listed when I go to System --> Administration --> Hardware

CELLWRITER:
The Cellwriter handwriting recognition program wasn't in the repositories that I had, so I found an RPM of cellwriter here and installed it.
XOURNAL:
When I installed Xournal, it did not create a Gnome menu entry for itself. I added a link to the application in the Gnome panel. The Xournal icon was installed at /usr/share/xournal/pixmaps/xournal.svg, so I used that as the icon in the panel.
DROPBOX:
Binaries for Linux versions Dropbox are only available for Ubuntu and Fedora at this point, and Dropbox threw up an error during the ./configure portion of compiling from source for me:
checking for NAUTILUS... configure: error: Package requirements (libnautilus-extension >= 2.16.0) were not met:
No package 'libnautilus-extension' found
Consider adjusting the PKG_CONFIG_PATH environment variable if you
installed software in a non-standard prefix.
Alternatively, you may set the environment variables NAUTILUS_CFLAGS
and NAUTILUS_LIBS to avoid the need to call pkg-config.
See the pkg-config man page for more details.
I considered simply installing the dropboxd daemon, using the instructions for a text based install of Dropbox that were provided on the Dropbox site, and I would have if I were to run CentOS as a full time desktop OS, but I felt that was beyond the scope of this review.
WACOM TABLET FUNCTIONALITY:
I was hopeful about this functionality, given that the Wacom Tablet PC adapter is listed under System --> Administration --> Hardware, as the screenshot below shows.

I also found a Wacom Control Panel tool under Applications --> System Tools --> Wacom Control Panel. However, the tool was not very helpful, as the screenshot shows. The Control Panel tool did not allow me to select or change any options, despite knowing the information contained in the Device Manager.

I attempted to add info manually to /etc/X11/xorg.conf as suggested by Thinkwiki:
I restarted my X server and........no luck.Section "InputDevice"
Driver "wacom"
Identifier "cursor"
Option "Device" "/dev/ttyS0"
Option "Type" "cursor"
Option "ForceDevice" "ISDV4"
Option "Mode" "Absolute"
EndSection
Section "InputDevice"
Driver "wacom"
Identifier "stylus"
Option "Device" "/dev/ttyS0"
Option "Type" "stylus"
Option "ForceDevice" "ISDV4"
EndSection
Section "InputDevice"
Driver "wacom"
Identifier "eraser"
Option "Device" "/dev/ttyS0"
Option "Type" "eraser"
Option "ForceDevice" "ISDV4"
EndSection
I restarted the whole laptop........no luck.
This was the point that I abandoned trying to get the tablet portion working.
I understand that The Linux Wacom Project may be able to help me further, but I do not intend to run CentOS on this laptop much longer, given that some other distros appear to be more tablet friendly.
CONCLUSION:
My experience with CentOS leads me to believe that tablet PCs are not a big priority in the development of this distribution, especially compared to my Ubuntu 9.04 install. That's not awful, though, since CentOS is designed for stability first, instead of shiny new features. During the testing process, I was able to install and configure Cacti on this laptop, which was enjoyable, but I will detail that process in a different post. I plan on installing something else on this laptop soon, as CentOS doesn't take advantage of everything the X41 tablet has to offer.
Wednesday, July 1, 2009
Port Forwarding using Tomato and DynDNS
Port Forwarding on the router level is useful if you have more than one computer, but you know that you plan to make specific services available to the outside world on only one of the computers that you own. Also, you can make different services point to different computers. For example, you can forward ssh traffic to computer A, use computer B as your web server, or (if you read my previous post) access the web server running inside of VirtualBox on Computer C.
This particular post will refer to forwarding single ports to particular machines on your internal network, using the Tomato router firmware, as well as using a service called DynDNS to more easily access your dynamic IP address over the Internet.
This setup was accomplished with a Buffalo WHR-HP-G54 router, flashed with the Tomato Firmware.
PORT FORWARDING IN TOMATO:
Tomato is user friendly, providing sample port forwarding to help users with the formatting and syntax of the process.
Here is a screen shot that shows the port forwarding screen:

To forward a single port to the same port on a particular IP:
External Ports: 9090
Internal Ports: (blank)
Internal Address: 192.168.1.11 (your computer's IP address)
To forward a port to a different internal port:
External Ports: 1010 (as seen from the Internet)
Internal Ports: 1212 (as seen inside your LAN)
Internal Address: 192.168.1.11 (your computer's IP address)
You can choose to forward TCP packets, UDP packets, or both.
If you read my previous post about port forwarding in VirtualBox, port forwarding in your router would allow you to make open virtual machine ports to the Internet at large.
As an example, you could open port 80 on your virtual machine, forward traffic from port 80 to port 8080 of host Computer A, then have incoming router traffic on port 80 forward to port 8080 on Computer A, so that when external traffic comes in on port 80, it is routed to the server virtual machine running on Computer A.
USING DynDNS:
What is DynDNS? Allow me to borrow this description from their website:
Now, instead of having to remember your external IP address of 12.34.56.78 (or a dynamically changing one), you can use a service such as DynDNS to be able to use samplename.thruhere.net instead of 12.34.56.78 in an Internet browser such as Firefox to access your computer. It tends to be easier to remember, and easier to tell your friends or colleagues.
For the free DNS forwarding, DynDNS offers these domains to choose from:
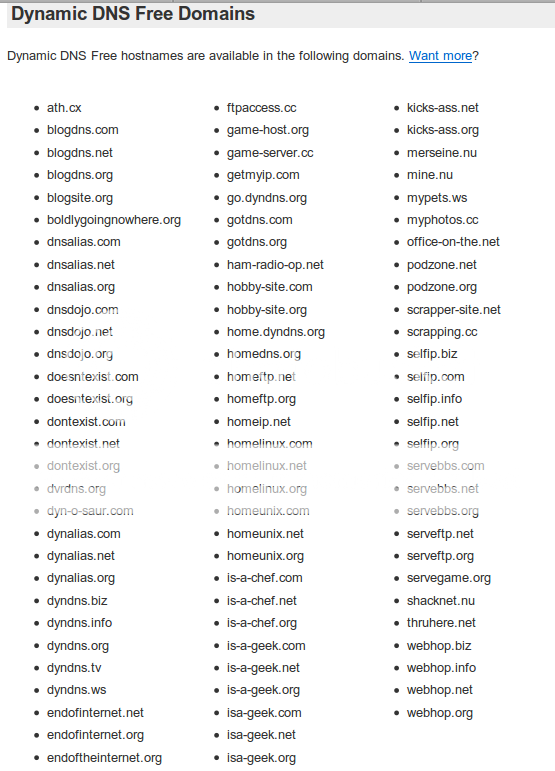
Sign up for a free DynDNS account, choose a domain and link it to your dynamic IP. From now on, you can use this personal URL to access your computer from the Internet. If you want, you can continue to use your IP, but I'd be surprised if you do. This URL actually points to your router, so port forwarding from your router allows you to point traffic from the Internet to particular computers on your network.
VERIFYING ROUTER SECURITY:
First, a security precaution: Many routers are administered through port 80 (the standard web traffic port), even if traffic comes externally. Tomato allows you to disable external access (or change the administration port), so it isn't as big of an issue, but make sure to look in your router settings to verify that you are not opening yourself up to convenient remote router cracking (especially if you still use the default passwords- shame, shame!).
One way to verify if your router is allowing remote administrative access is this:
OK. You have your shiny new DynDNS account, and you've secured your router from external attacks. Now, enjoy the convenience of your work! For example, FreeNAS offers a Transmission Bittorrent WebGUI which defaults to port 9091. You can forward external traffic from this port directly to your FreeNAS box. Now, samplename.thruhere.net:9091 would bring up your Transmission WebGUI, anywhere in the world that has internet access! Alternatively, you could forward port 80 to port 9091 of your FreeNAS box, thus allowing samplename.thruhere.net to access your WebGUI directly. I suggest using user authentication, but that's up to you.
Now, while reading Distrowatch, if your Linux distribution of choice releases a new version, this would allow you to add a torrent while drinking a coffee at a coffee house, then come home to a torrent that is already downloaded. That beats the alternative of waiting to start the download until you get home. Enjoy!
This particular post will refer to forwarding single ports to particular machines on your internal network, using the Tomato router firmware, as well as using a service called DynDNS to more easily access your dynamic IP address over the Internet.
This setup was accomplished with a Buffalo WHR-HP-G54 router, flashed with the Tomato Firmware.
PORT FORWARDING IN TOMATO:
Tomato is user friendly, providing sample port forwarding to help users with the formatting and syntax of the process.
Here is a screen shot that shows the port forwarding screen:
To forward a single port to the same port on a particular IP:
External Ports: 9090
Internal Ports: (blank)
Internal Address: 192.168.1.11 (your computer's IP address)
To forward a port to a different internal port:
External Ports: 1010 (as seen from the Internet)
Internal Ports: 1212 (as seen inside your LAN)
Internal Address: 192.168.1.11 (your computer's IP address)
You can choose to forward TCP packets, UDP packets, or both.
If you read my previous post about port forwarding in VirtualBox, port forwarding in your router would allow you to make open virtual machine ports to the Internet at large.
As an example, you could open port 80 on your virtual machine, forward traffic from port 80 to port 8080 of host Computer A, then have incoming router traffic on port 80 forward to port 8080 on Computer A, so that when external traffic comes in on port 80, it is routed to the server virtual machine running on Computer A.
USING DynDNS:
What is DynDNS? Allow me to borrow this description from their website:
Dynamic DNS Free (DDNS) allows you to create a hostname that points to your home or office IP address, providing an easy-to-remember URL for quick access. We also provide an update mechanism which makes the hostname work with your dynamic IP address. We continue to offer this service free to the Internet community as we have done so for nearly 10 years.
Now, instead of having to remember your external IP address of 12.34.56.78 (or a dynamically changing one), you can use a service such as DynDNS to be able to use samplename.thruhere.net instead of 12.34.56.78 in an Internet browser such as Firefox to access your computer. It tends to be easier to remember, and easier to tell your friends or colleagues.
For the free DNS forwarding, DynDNS offers these domains to choose from:
Sign up for a free DynDNS account, choose a domain and link it to your dynamic IP. From now on, you can use this personal URL to access your computer from the Internet. If you want, you can continue to use your IP, but I'd be surprised if you do. This URL actually points to your router, so port forwarding from your router allows you to point traffic from the Internet to particular computers on your network.
VERIFYING ROUTER SECURITY:
First, a security precaution: Many routers are administered through port 80 (the standard web traffic port), even if traffic comes externally. Tomato allows you to disable external access (or change the administration port), so it isn't as big of an issue, but make sure to look in your router settings to verify that you are not opening yourself up to convenient remote router cracking (especially if you still use the default passwords- shame, shame!).
One way to verify if your router is allowing remote administrative access is this:
- Go to IP Chicken to get your current IP.
- Copy that address and paste it into your web browser address window and press Enter.
- If your router password verification window comes up, you can access your router remotely.
- Try this again with your shiny new DynDNS URL. Note that the result should be the same as if your typed in the IP directly.
OK. You have your shiny new DynDNS account, and you've secured your router from external attacks. Now, enjoy the convenience of your work! For example, FreeNAS offers a Transmission Bittorrent WebGUI which defaults to port 9091. You can forward external traffic from this port directly to your FreeNAS box. Now, samplename.thruhere.net:9091 would bring up your Transmission WebGUI, anywhere in the world that has internet access! Alternatively, you could forward port 80 to port 9091 of your FreeNAS box, thus allowing samplename.thruhere.net to access your WebGUI directly. I suggest using user authentication, but that's up to you.
Now, while reading Distrowatch, if your Linux distribution of choice releases a new version, this would allow you to add a torrent while drinking a coffee at a coffee house, then come home to a torrent that is already downloaded. That beats the alternative of waiting to start the download until you get home. Enjoy!
VirtualBox NAT Port Forwarding with VBoxManage
VirtualBox is a free, powerful and versatile virtualization program which is available for Linux, Mac, and Windows hosts, and can virtualize many different Operating Systems. VirtualBox was originally developed by innotek, but was purchased by Sun and renamed Sun xVM VirtualBox. There are several versions of the program, but I use the free closed-source version, since it has more features than Virtualbox OSE.
Several networking modes are available for the Virtualbox guest OS to connect to the Internet, but I will specifically mention Network Address Translation (NAT) networking here.
The Virtualbox manual describes the advantages and disadvantages of NAT in this way:
PORT FORWARDING IN VIRTUALBOX:
Port Forwarding can be initiated through the powerful and versatile VBoxManage command-line utility. VBoxManage has many options, but we will be using the “setextradata” feature to configure port forwarding.
The following commands will allow you to access your virtual machine via ssh. For this to work, I am making several assumptions about the guest OS:
* Your virtual machine is not currently running, but has already been created and saved.
* Your guest OS has ssh installed and correctly configured
* Your guest OS is set up with the VirtualBox's default virtual network hardware (PCNET III)
* sshd is listening for incoming connections at the default port (port 22)
* Your guest OS is named “VM Name Here”, although I'd wager that isn't the actual name of your VM.
If you don't know the name of your virtual machine, the easiest way to verify the name is to start Virtualbox and to look at the names of the machines listed on the main screen. Scrolling down on the details also allows you to see other information, such as the network adapter being used.
The following commands will forward TCP traffic that originates from port 2222 on your host OS to port 22 on your guest OS:
$ VBoxManage setextradata "VM Name Here" "VBoxInternal/Devices/pcnet/0/LUN#0/Config/guestssh/Protocol" TCP
$ VBoxManage setextradata "VM Name Here" "VBoxInternal/Devices/pcnet/0/LUN#0/Config/guestssh/GuestPort" 22
$ VBoxManage setextradata "VM Name Here” "VBoxInternal/Devices/pcnet/0/LUN#0/Config/guestssh/HostPort" 2222
Note the usage of double quotes for the virtual machine name. If you decided on a virtual machine name that is only one word such as “VMNameHere”, you can technically omit these double quotes, like this:
$ VBoxManage setextradata VMNameHere "VBoxInternal/Devices/pcnet/0/LUN#0/Config/guestssh/Protocol" TCP
$ VBoxManage setextradata VMNameHere "VBoxInternal/Devices/pcnet/0/LUN#0/Config/guestssh/GuestPort" 22
$ VBoxManage setextradata VMNameHere "VBoxInternal/Devices/pcnet/0/LUN#0/Config/guestssh/HostPort" 2222
There is no harm done in leaving them there, so do whatever makes you feel most comfortable.
FYI, there are some limitations to NAT port forwarding, and I will list them as they are listed in the VirtualBox Manual:
VBoxManage is an incredibly powerful utility, and this post just scratches the surface of its abilities. There is an entire section of the user manual dedicated to VBoxManage, and I encourage you to read it and discover the other things it can do.
I will cover Port Forwarding from the router to the host computer in a later post.
Several networking modes are available for the Virtualbox guest OS to connect to the Internet, but I will specifically mention Network Address Translation (NAT) networking here.
The Virtualbox manual describes the advantages and disadvantages of NAT in this way:
Network Address Translation (NAT) is the simplest way of accessing an external network from a virtual machine. Usually, it does not require any configuration on the host network and guest system. For this reason, it is the default networking mode in VirtualBox.So, your shiny new virtual machine can access the net, but is invisible to other devices on your network. Usually this isn't an issue, but it isn't possible to ssh into your virtual machine or access any services of the machine (such as a webserver) without configuration of port forwarding.
A virtual machine with NAT enabled acts much like a real computer that connects to the Internet through a router. The “router”, in this case, is the VirtualBox networking engine, which maps traffic from and to the virtual machine transparently. The disadvantage of NAT mode is that, much like a private network behind a router, the virtual machine is invisible and unreachable from the outside internet; you cannot run a server this way unless you set up port forwarding (described below).
PORT FORWARDING IN VIRTUALBOX:
Port Forwarding can be initiated through the powerful and versatile VBoxManage command-line utility. VBoxManage has many options, but we will be using the “setextradata” feature to configure port forwarding.
The following commands will allow you to access your virtual machine via ssh. For this to work, I am making several assumptions about the guest OS:
* Your virtual machine is not currently running, but has already been created and saved.
* Your guest OS has ssh installed and correctly configured
* Your guest OS is set up with the VirtualBox's default virtual network hardware (PCNET III)
* sshd is listening for incoming connections at the default port (port 22)
* Your guest OS is named “VM Name Here”, although I'd wager that isn't the actual name of your VM.
If you don't know the name of your virtual machine, the easiest way to verify the name is to start Virtualbox and to look at the names of the machines listed on the main screen. Scrolling down on the details also allows you to see other information, such as the network adapter being used.

The following commands will forward TCP traffic that originates from port 2222 on your host OS to port 22 on your guest OS:
$ VBoxManage setextradata "VM Name Here" "VBoxInternal/Devices/pcnet/0/LUN#0/Config/guestssh/Protocol" TCP
$ VBoxManage setextradata "VM Name Here" "VBoxInternal/Devices/pcnet/0/LUN#0/Config/guestssh/GuestPort" 22
$ VBoxManage setextradata "VM Name Here” "VBoxInternal/Devices/pcnet/0/LUN#0/Config/guestssh/HostPort" 2222
Note the usage of double quotes for the virtual machine name. If you decided on a virtual machine name that is only one word such as “VMNameHere”, you can technically omit these double quotes, like this:
$ VBoxManage setextradata VMNameHere "VBoxInternal/Devices/pcnet/0/LUN#0/Config/guestssh/Protocol" TCP
$ VBoxManage setextradata VMNameHere "VBoxInternal/Devices/pcnet/0/LUN#0/Config/guestssh/GuestPort" 22
$ VBoxManage setextradata VMNameHere "VBoxInternal/Devices/pcnet/0/LUN#0/Config/guestssh/HostPort" 2222
There is no harm done in leaving them there, so do whatever makes you feel most comfortable.
FYI, there are some limitations to NAT port forwarding, and I will list them as they are listed in the VirtualBox Manual:
There are four limitations of NAT mode which users should be aware of:These limitations normally don’t affect standard network use. But the presence of
- ICMP protocol limitations: Some frequently used network debugging tools (e.g. ping or tracerouting) rely on the ICMP protocol for sending/receiving messages. While ICMP support has been improved with VirtualBox 2.1 (ping should now work), some other tools may not work reliably.
- Receiving of UDP broadcasts is not reliable: The guest does not reliably receive broadcasts, since, in order to save resources, it only listens for a certain amount of time after the guest has sent UDP data on a particular port. As a consequence, NetBios name resolution based on broadcasts does not always work (but WINS always works). As a workaround, you can use the numeric IP of the desired server in the \\server\share notation.
- Protocols such as GRE are unsupported: Protocols other than TCP and UDP are not supported. This means some VPN products (e.g. PPTP from Microsoft) cannot be used. There are other VPN products which use simply TCP and UDP.
- Forwarding host ports lower than 1024 impossible: On Unix-based hosts (e.g. Linux, Solaris, Mac OS X) it is not possible to bind to ports below 1024 from applications that are not run by root. As a result, if you try to configure such a port forwarding, the VM will refuse to start.
NAT has also subtle effects that may interfere with protocols that are normally working. One example is NFS, where the server is often configured to refuse connections from non-privileged ports (i.e. ports not below 1024).
VBoxManage is an incredibly powerful utility, and this post just scratches the surface of its abilities. There is an entire section of the user manual dedicated to VBoxManage, and I encourage you to read it and discover the other things it can do.
I will cover Port Forwarding from the router to the host computer in a later post.
VirtualBox 3.0 released!
Good news! VirtualBox Version 3.0 has been released!
Here is the changelog from the VirtualBox web site:
The updated 3D support should be the most exciting for many users. It looks like VirtualBox 3.0, with support for DirectX 8/9 as well as OpenGL 2.0, might become a viable option for computer games running within a Windows Guest OS instance. I might just break out my old copy of Freelancer and give it a try!VirtualBox 3.0.0 (released 2009-06-30)
This version is a major update. The following major new features were added:
- Guest SMP with up to 32 virtual CPUs (VT-x and AMD-V only; see chapter 3.7.2.2 of the user manual)
- Windows guests: ability to use Direct3D 8/9 applications / games (experimental; see chapter 4.8 of the user manual)
- Support for OpenGL 2.0 for Windows, Linux and Solaris guests
In addition, the following items were fixed and/or added:
- Solaris hosts: allow suspend/resume on the host when a VM is running (bug #3826)
- Solaris hosts: loosen the restriction for contiguous physical memory under certain conditions
- Mac OS X hosts: fixed guest PAE
- Linux hosts: kernel module compile fixes for 2.6.31 (bug Fixed in SVN (closed)">#4264)
- VMM: fixed occasional guru meditation when loading a saved state (VT-x only)
- VMM: eliminated IO-APIC overhead with 32 bits guests (VT-x only, some Intel CPUs don’t support this feature (most do); bug #638)
- VMM: fixed 64 bits CentOS guest hangs during early boot (AMD-V only; bug fixed in SVN (closed)">#3927)
- VMM: performance improvements for certain PAE guests (e.g. Linux 2.6.29+ kernels)
- VMM: some Windows guests detected a completely wrong CPU frequency (bug fixed in SVN (closed)">#2227)
- VMM: fixed hanging and unkillable VM processes (bug fixed in ... (closed)">#4040)
- VMM: fixed random infrequent guest crashes due to XMM state corruption (Win64 hosts only)
- VMM: performance improvements for network I/O (VT-x/AMD-V only)
- GUI: added mini toolbar for fullscreen and seamless mode (Thanks to Huihong Luo)
- GUI: redesigned settings dialogs
- GUI: allow to create/remove more than one host-only network adapters (non Windows hosts)
- GUI: display estimated time for long running operations (e.g. OVF import/export)
- GUI: fixed rare hangs when open the OVF import/export wizards (bug #4157)
- 3D support: fixed VM crashes for client applications using incorrect OpenGL states
- 3D support: fixed memory corruption when querying for supported texture compression formats
- 3D support: fixed incorrect rendering of glDrawRangeElements
- 3D support: fixed memory leak when using VBOs
- 3D support: fixed glew library detection
- 3D support: fixed random textures corruption
- VRDP: support Windows 7 RDP client
- Networking: fixed another problem with TX checksum offloading with Linux kernels up to version 2.6.18
- NAT: fixed “open ports on virtual router 10.0.2.2 - 513, 514” (forum)
- NAT: allow to configure socket and internal parameters
- NAT: allow to bind sockets to specific interface
- PXE boot: significant performance increase (VT-x/AMD-V only)
- VHD: properly write empty sectors when cloning of VHD images (bug fixed in svn (closed)">#4080)
- VHD: fixed crash when discarding snapshots of a VHD image
- VHD: fixed access beyond the block bitmap which could lead to arbitrary crashes
- VBoxManage: fixed incorrect partition table processing when creating VMDK files giving raw partition access (bug fixed in svn (closed)">#3510)
- VBoxManage: support cloning to existing image file
- OVF: several OVF 1.0 compatibility fixes
- OVF: fixed exporting of disk images when multiple virtual machines are exported at once
- Virtual mouse device: eliminated micro-movements of the virtual mouse which were confusing some applications (bug fixed in SVN (closed)">#3782)
- Shared Folders: sometimes a file was created using the wrong permissions (2.2.0 regression; bug ... (closed)">#3785)
- Shared Folders: allow to change file attributes from Linux guests and use the correct file mode when creating files
- Shared Folders: some content was incorrectly written under certain conditions (bug #1187)
- Shared Folders: fixed incorrect file timestamps, when using Windows guest on a Linux host (bug #3404)
- X11 clipboard: fix duplicate end of lines (bug fixed in SVN (closed)">#4270)
- X11 guests: a number of shared clipboard fixes
- Linux guests: Guest Additions support for SUSE Linux Enterprise Desktop 11
- Linux guests: new daemon vboxadd-service to handle time synchronization and guest property lookup
- Linux guests: implemented guest properties (OS info, logged in users, basic network information)
- Windows host installer: VirtualBox Python API can now be installed automatically (requires Python and Win32 Extensions installed)
- USB: Support for high-speed isochronous endpoints has been added. In addition, read-ahead buffering is performed for input endpoints (currently Linux hosts only). This should allow additional devices to work, notably webcams (bug #242).
- USB: fixed error handling for some USB dongles
- Web service: fixed inability to handle NULL pointers for object arguments, which are valid values for a lot of APIs, in both the raw and the object-oriented web service.
- Web service: object-oriented bindings for JAX-WS did not exhibit interface inheritance correctly, fixed
- Web service: added support for IDisplay and IGuest interfaces, which were previously unavailable
- Registration dialog uses Sun Online accounts now
Subscribe to:
Comments (Atom)